PayPal products
There are different PayPal products available for accepting online payment. Few of them are listed below.
- PayPal Payments Standard
- Express Checkout
- Website Payments Pro
- Payflow Gateway
- Mobile Checkout
- Mass Payments
- Virtual Terminal
- IPN
Of the above, Paypal Payments Standard, Express Checkout and IPN are available for all countries. For one of our projects, we used Express Checkout.
Steps for implementing ‘Express Checkout’ payment method
- Login to PayPal business account
- Use sandbox for testing
- Coding, debugging and testing the application
- Going live
Login to PayPal business account
To accept payment, the service provider should have a business account.
Use Sandbox for PayPal testing
Sandbox is a free-to-use service. In our project, we created one business account and few personal accounts for testing. We created these accounts by visiting https://www.sandbox.paypal.com. To simulate PayPal checkout flow, we added money to these accounts and did some transactions.
Coding, debugging and testing the application
PayPal Express Checkout
Express Checkout allows merchants and developers to minimize the number of steps a customer should complete to checkout. Customers can checkout without leaving the merchant’s site via PayPal in-context checkout window overlaying the merchant’s website or pay on PayPal’s secure site and return to the merchant’s website to complete the transaction. We used in-context checkout method in our project.
Checkout Flow
When the customer clicks on ‘pay with PayPal’ button, the merchant’s website makes an API call to PayPal to pass the transaction details. Customer is redirected to an in-context PayPal checkout window to login. After logging in, the customer selects a shipping address and payment method. Note: In our project, shipping address was not required, so we omitted that.
PayPal then redirects the customer to the merchant’s website to review and approve the order details. The merchant’s website then makes an API call to retrieve transaction details, email address, and other information needed to fulfill the order. Customer then reviews and approves the payment. When customer completes the order, the website makes an API call (unseen by the customer) to PayPal to request payment. After successful transaction, an email is sent to the customer providing transaction details. If customer doesn’t want to approve the payment, he clicks on ‘cancel and return to merchant’s website link.’ Note: For fraud detection, we have used sift science in our project.
NVP/SOAP API SDKs
For integration, i.e., for processing and accepting PayPal’s payment, we used PayPal SDK instead of creating messages as NVP strings or SOAP structures. These SDKs enabled us to code in our preferred programming language. We used NVP/SOAP API SDK in java, viz., Merchant Java SDK. While testing with sandbox, we used sandbox api credentials. For doing real transactions, we replaced api keys with those from our live paypal account.
PayPal Authorization Flow
- Authorization
- Capture payment
- Void authorization
In our project, we processed the customer’s request after accepting the payment from them through PayPal. First, we did payment authorization, i.e., customer’s amount will be put on hold by PayPal. After authorization, we processed the customer’s request. If customer’s request was processed successfully, we captured the payment, else we voided the authorization, i.e., removed ‘hold.’
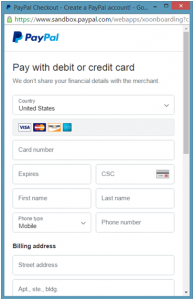
Accepting credit card/debit card payment with PayPal
If the customer does not have a PayPal account, payment can be done using a credit/debit card. However, we can’t modify the default UI screen and we can’t write our own form validations, etc. To do so, we have to develop credit/debit card functionality separately.
We can use rest-api-sdk to process credit/debit card, create tokens, accept payment, etc. Here, we can customize credit/debit card processing form. We can write form validation, enhance look and feel of buttons and input text boxes, etc. To save the card used by the customer for future purchases, we don’t have to save card numbers and details, but we just have to save the card tokens which we created with the help of rest api.
Maven dependency for rest api sdk is as below.
</dependency>
<groupId>com.PayPal.sdk</groupId>
<artifactId>rest-api-sdk</artifactId>
<version>1.4.1</version>
</dependency>
Debit/credit card form in express checkout will look as shown below.
Payment flow Diagram
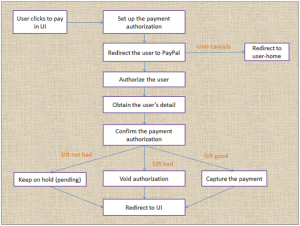
Note: Sift refers to Sift Science, a fraud detection solution for websites, which will not be discussed in detail here.
Going live
Once we finish coding, debugging and testing our application, we can move our application to PayPal’s production environment.
While moving the application live:
- Replace the Sandbox API credentials with live PayPal account’s credentials.
- Update PayPal endpoints from the Sandbox to the PayPal production servers.
- Replace the sandbox mode with live mode in configuration.
- Register application with PayPal.
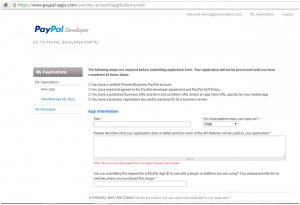
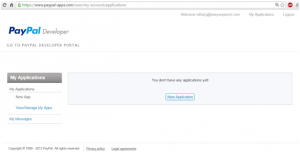
Steps for registering the application to PayPal.
- Go to https://developer.PayPal.com/ log in using PayPal business account.
- Click Dashboard at the top of the page to open the My Apps & Credentials.
- Click the Create and manage NVP/SOAP API apps. link at the bottom of the page.
- Click on Login with PayPal.
- Login with your primary username and password.
- Click on New Application.
After clicking on New Application, we will get below form which has to be filled out and submitted.